There are thousands of Drupal core and contributed modules to choose from, so why would anyone still want to build custom modules? The majority of the time it’s because website builders are looking for customized features to achieve specific functionalities or to stand out from the competition. For components that aren’t commonplace, a contributed or a core module does not always meet exact requirements. That’s when custom module development comes into play.
Thanks to Drupal’s flexibility, you can now create powerful custom modules to add functionality and logic to meet your unique business requirements. Read on to find an easy step-by-step guide on custom module development and also applying CSS assets on your Drupal 9 website.
Drupal 9 Custom Module Development in 5 easy steps
Here are some essential steps you need to follow to get started with creating a custom module in Drupal 9.
Step 1: Create a custom folder for your module

Drupal 9 file structure
Step 2: Choose a short name or machine name for your module
Some important rules to follow before you choose a name for your module:
- It must start with a letter.
- It must contain only lowercase letters, digits, and underscores.
- It must not contain any spaces.
- It must not be longer than 50 characters.
- It must be unique. Your module should not have the same short name as any other module, theme, theme engine, or installation profile you will use on the site.
- It should not be any of the reserved terms: src, lib, vendor, assets, CSS, files, images, js, misc, templates, includes, fixtures, or Drupal.
Let's name it: “hello_module”.
Step 3: Create a .info.yml file
Your .info.yml file holds the module information, compatibility, and dependencies information. The .info.yml file is created to notify Drupal about its existence in the system and provide information for the Drupal Web UI administration pages.
Our file name: hello_module.info.yml
name: Hello Module
type: module
description: 'First custom drupal 9 module'
package: custom
core_version_requirement: ^9 || ^10
The .info.yml file comprises 3 things: key, separator, value.
Where the key is the name, the separator is ‘:’ (colon) and the value is “Hello Module”.
Step 4: Create a Controller
Controllers are responsible for controlling the flow of the application and its logic. Controllers process user requests and determine the appropriate course of action. They can perform one or more actions and return different results to a particular request. The controller in our module is responsible for generating the body and sending it back to the page.
Now let’s create a file in a folder structured as /src/Controller/WelcomeController.php
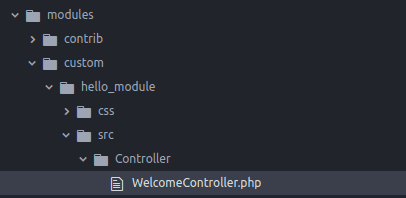
Our file name: WelcomeController.php

 RSS Feed
