|
Accessibility Challenges in an Emergency (Web Design for Disaster Part 3)
During a natural disaster or other public emergency, conditions may change dramatically for your users, inflicting a wide variety of new physical, mental, and environmental challenges. At the same time, access to your platform may become more important than ever, so it is crucial to consider unexpected situations and take steps that ensure your system will remain accessible when needed most.
Categories
Originally from Drupal.org aggregator https://ift.tt/31KSYGp
0 Comments
What We're Doing Here: Webforms and Third Party IntegrationIn Drupal 8, the Webform module can do a lot out of the box. It can do even more with the multitude of its contributed modules. But every now and then a situation arises where you need to get into the guts of create some custom webform magic to get the job done. Originally from Drupal.org aggregator https://ift.tt/3bf50uW
In the last few months, I've been doing a lot of Drupal core contributions and, even though I've done plenty of contributions over the years, I've recently learned some new things when reviewing issues. I've made this cheat sheet for anyone who wants to help review Drupal issues and wants to make sure everything has been thoroughly checked before marking "RTBC" (Reviewed & tested by the community). There is plenty of great documentation on the development contribution process that explains some of these items further which I've also linked to below. Documentation is also being improved right now so I will update this post as new information is available. For now, hopefully this post can serve as a handy reference. Originally from Drupal.org aggregator https://ift.tt/2G3FI7n 
Much has been written on the theory and practice of agile (or Agile, if you prefer--the debate is real) including books, blog posts, and formal training. What this guide aims to cover in depth is how to apply that theory to branch management in git, specifically for those working with Drupal 7, Drupal 8 or Drupal 9. The following content is based on the work of our talented friend and former colleague Matt Corks. Who is this guide for?This guide is for you if:
Contents
Prerequisites and PrepTo make this work, it's best to use an issue tracker with a ticket for each user story, and to make all changes to your site on a separate git branch labelled with that ticket number. The changesets should be self-contained, and perform all necessary database changes in code via update hooks, features (Drupal 7), or the configuration management system (Drupal 8/9). Any further steps necessary to test or deploy the new version should be clearly described in the ticket description. Once all your updates are in code, you're ready to use git to prepare for and manage your testing and deployment process. You'll need to adopt specific git practices to make this work smoothly. Drupal with Git: Best PracticesDrupal 7 + Git best practicesIn Drupal 7, the best practice is to export all possible configurations using the Features module, so that it can be tracked and versioned in git. After setting up your site's views, content types, variables, and other configuration, you would use the Features module to export these to code as a series of special modules in sites/all/modules/features/ and from there commit them to git. It's simplest to group these by functionality (for example, you could create one features module which contains all the configuration necessary for the blog section of your site). After making changes, run To learn more about exporting the configuration of your Drupal 7 site using features, see the documentation. Drupal 8/9 + Git best practicesIn Drupal 8 and higher, most configuration is stored in YAML files, making this much simpler. By default D8 configuration is stored in the public files/ directory under a difficult-to-guess directory name. Wherever possible, add the following to settings.php or settings.local.php to define the config directory, which should be someplace outside the webserver docroot. (This means your website docroot will be a subdirectory of your git root folder, giving you a place above that to store test scripts and other files outside the docroot.)
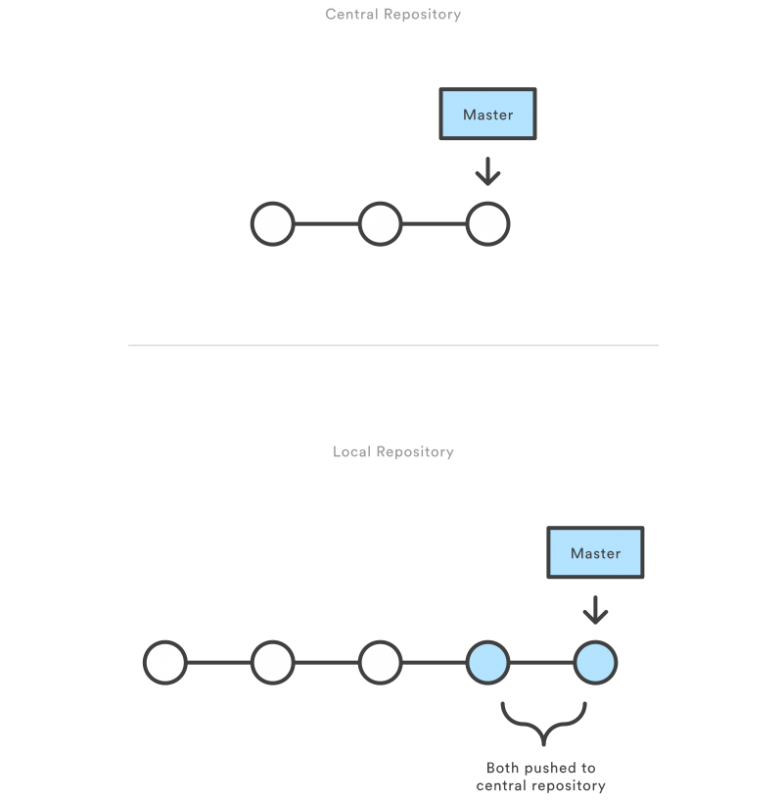
Once this is done, run the following after making local changes on dev machines: You can now commit and push these changes to your git repository. To import these on test, staging, and production environments, do a git pull and then run the following: Like with D7 features, the suggested workflow is to avoid making changes to these files directly on the production website, but instead to deploy by importing from YAML. Changes made directly on prod will be discarded. You can read more about the basics of configuration management in Drupal 8 here. It's also possible to use configuration files during site install to spin up a site instance without a database, as described in this article. You should also have a convenient way to fetch a copy of the production database from dev & staging environments (eg via drush aliases), and use the Stage File Proxy module to avoid having to sync public files from prod back to dev and stage environments until they're needed. Use Git Branching StrategiesTo explain our preferred git workflow, we'll start by explaining some other, simpler workflows that can be used by smaller teams. My reference for this is the tutorial from Atlassian. We're assuming knowledge of basic git concepts like branching, committing, and pulling. If these are new to you, we suggest taking the time to read an introductory tutorial such as this one, again from Atlassian. Method 1: Centralized workflowThis is the simplest possible git workflow.
Method 2: Feature branches, aka GitHub-style pull requestsOnce multiple people are working on a codebase at the same time, it's necessary to use a more sophisticated model. Many open source projects on GitHub work this way, with one person responsible for testing and approving all proposed changes.
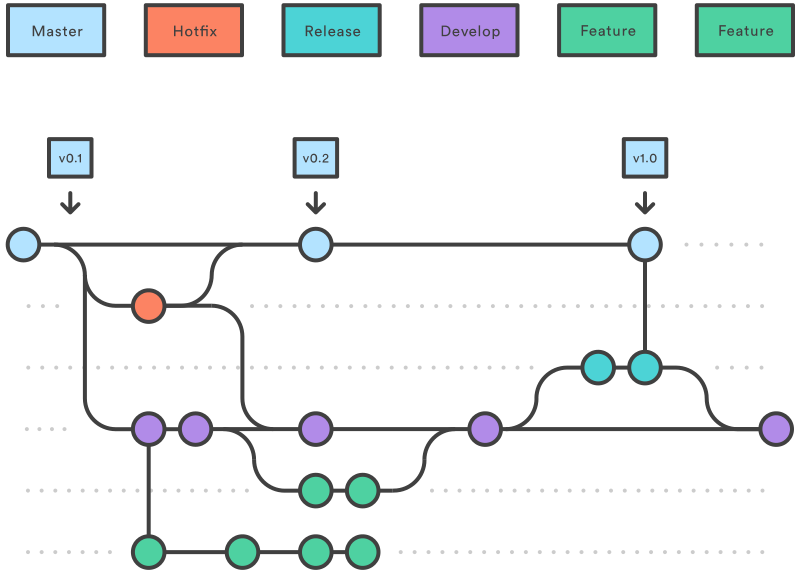
Method 3: GitFlowOnce your project requires a review process for each set of new features, some of which may depend on others to be completed at the same time, it's necessary to create branches for each release so that these can be tested as a group. It follows that you might need to remove a feature from a release if it isn't accepted during testing, and that you'll occasionally need to urgently fix the production version of the code without waiting for your usual release cycle.
Git branching best practices ✅Make sure every commit message includes the ticket number, both to create pointers from your issue tracker, and to allow you to find commits related to a given ticket at a later date. You can even set up your CI/automated testing scripts to reject commits without numbers, and create a script in .git/hooks/prepare-commit-msg.sh to insert this automatically in the commit message template. Here's one such script. Set Managing multiple remotesYou might want to use multiple remotes, for example a local GitLab instance, GitHub for automated integration with Circle CI, and a git instance at your hosting provider (e.g. Pantheon). You can do this by creating a placeholder remote called
Working with BranchesNaming conventions
List all branches
Start working on a feature
Note: on rebasing Rebase when you want to rewrite history (e.g. remove commits of debugging code); merge when you want to preserve history. You should only rebase a local branch that isn't yet pushed to origin and shared with others! If you're not already familiar with rebasing, ignore this section. If you really want to learn about this, this tutorial is helpful. If your goal for rebasing is simply to reduce clutter in your git log, consider using Review and accept a feature
Prepare release branchOnce enough tickets have been closed and their corresponding feature branches merged into the dev branch, create a release branch and deploy to your staging environment for review. On local machine
On staging server
Deploy releaseOn local machine
On production server
Hotfix production siteOn local machine
On production server
Resolve merge conflictsYour tickets should be small enough in scope that merge conflicts don't happen very often. Here are three things you can do when they come up:
There are lots of resources on resolving conflicts online. Here's one good intro-level tutorial. Here's an example of working with a three-way merge using vim. Remove a feature that didn't pass review
A lengthy description of this process is available here. Find the commit that made a given changeA common complaint about gitflow is that it fills your git history with merge commits, but in fact git allows you to exclude these with
Need help?Leave your comments and questions in the comments, and we'll get back to you ASAP! For more in-depth assistance, reach out to our team of Drupal experts about personalized training options for your team. Originally from Drupal.org aggregator https://ift.tt/3b6Ueqs
I Already Have an Engineering Degree, so Why Study Drupal?
An Engineer’s Pivot into Web DevelopmentWhere it All BeganLike many, I struggled with what to study in college. I enjoyed math, science, and logic puzzles and craved working with new technologies. I wanted the skills to produce. It could have been websites, robots, companies...it didn’t matter as long as it was building the future. Ultimately I decided to pursue engineering. Originally from Drupal.org aggregator https://ift.tt/2G8nEZZ
Add SVG icons in Drupal menus jnettik Wed, 08/26/2020 - 07:57 Drupal Drupal Planet Code
Adding SVG icons or button styles into Drupal menus can be difficult — especially if you’re trying to avoid hardcoded, fragile solutions. With the Menu Link Attributes module you can easily add custom HTML5 data attributes to individual menu links, then use a preprocessor to inject your SVG icons and button styles based on those attributes. This solution takes just a couple of minutes and should work on Drupal 8 / Drupal 9 installations. Menu Link AttributesAdd the Menu Link Attributes module to your project via composer require drupal/menu_link_attributes, then enable the module with drush en menu_link_attributes or through the GUI on the Extend page. Once the module is enabled navigate to Structure > Menus and click the Available attributes tab. Here you’ll add YAML configuration that will describe which attribute options you’d like added to individual menu links. attributes: data-icon: label: Icon description: 'Replace the text of the menu link with an icon.' options: facebook: Facebook instagram: Instagram twitter: Twitter Paste the above YAML into the configuration textarea and click Save to create a new Icon option for menu links using the custom data-icon attribute. With this option you can add attributes to your link like data-icon=â€facebook†— or whatever you define in your config YAML. In our example we’ve defined facebook, instagram and twitter. Next you’ll want to assign these data attributes to your Drupal menu items using the GUI. For this example I’ve created three new menu items in the Main navigation (machine name main) menu: Facebook, Instagram, and Twitter. Create an SVG SpriteThis solution assumes you’re using a sprite of SVG icons and have included them somewhere in your templates. There are many ways to do this in Drupal, and covering them here would be outside the scope of this post. For simplicity, I’ve added the following sprite at the bottom of my page.html.twig file — you can follow suit to get this example working in your project. Notice that the value of the data-icon attribute in the menu links match the IDs of the symbol elements in the sprite. Inject your SVG markup with a preprocessorIn your mytheme.theme file (or sandbox.theme in my case), define the following hook to inject SVG markup in any menu item that has a data-icon attribute. As mentioned above, you’ll need to paste the SVG markup provided at the bottom of your page.html.twig file in order to see any icons actually populate. /** * @file * Functions to support theming in the Sandbox theme. */ use Drupal\Component\Render\FormattableMarkup; /** * Implements theme_preprocess_menu(). */ function sandbox_preprocess_menu(&$variables, $hook) { foreach ($variables['items'] as &$item) { $attributes = $item['url']->getOption('attributes'); if (isset($attributes['data-icon'])) { $title = new FormattableMarkup(' @title ', [ '@title' => $item['title'], '@icon' => $attributes['data-icon'], ]); $item['title'] = $title; } } } In this example using Sandbox, my custom sub-theme of Bartik, I added an svg { max-width: 25px; } CSS declaration to my theme's base styles so my menu icons aren’t the size of the whole viewport. Voila! Now you’ve got SVG icons in your Drupal menu links, and you can easily alter the data-icon link attributes with a point-and-click interface. Check back soon for a separate post on creating SVG sprites for your Drupal templates. Originally from Drupal.org aggregator https://ift.tt/2EIkkUC
|
AuthorWrite something about yourself. No need to be fancy, just an overview. Archives
April 2023
Categories |


 RSS Feed
